However, just like every other app, the Settings app can also sometimes malfunction. Recently, lots of users have reported that they are facing problems while accessing the Settings app. Few have reported that the Settings app crashes and fails to open. So, if you are experiencing problems with the Settings app in Windows 10, you might expect some help here. This article will list down the best ways to reset the Settings app in Windows 10. So, let’s check out. Also Read: Enable “Share Settings” Option in the Windows 10 Settings App
3 Best Methods to Reset Settings App in Windows 10
Note: Like resetting any other apps, resetting the Settings app will also remove various settings. It will bring different options to their default values. So, if you are using custom settings for any Windows feature, backup the important files.
1. Reset From the Start Menu
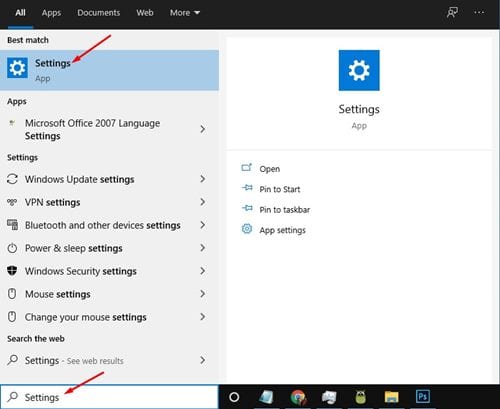
In this method, we will use the default Start menu to reset the Settings app on Windows 10. Follow some of the simple steps given below. Step 1. First of all, open the Windows Search box and type in ‘Settings.’
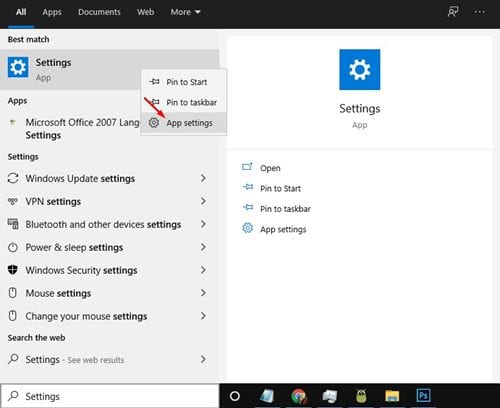
Step 2. Right-click on the Settings app, and click on ‘App Settings.’
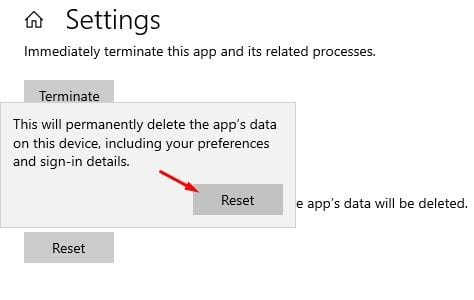
Step 3. Now on the Settings Window, scroll down and click on the ‘Reset‘ button as shown below.
Step 4. On the confirmation popup, click on the ‘Reset’ button once again.
2. Reset Settings App Using PowerShell
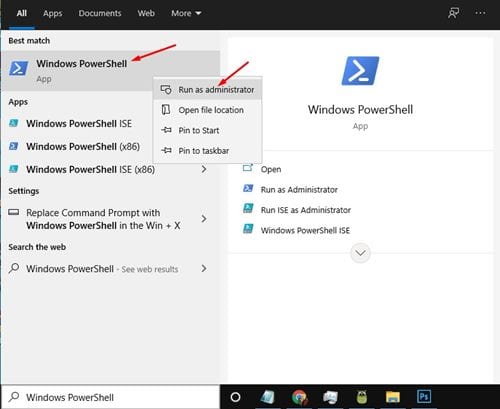
If you are running Windows 10 version 21H2 or later, you can use PowerShell to reset the Windows 10 Settings app. Follow some of the simple steps given below to reset the Settings app via PowerShell. Step 1. First of all, open Windows Search and search for ‘Windows PowerShell.’ Step 2. Right-click on the Windows Powershell and select ‘Run as Administrator.’
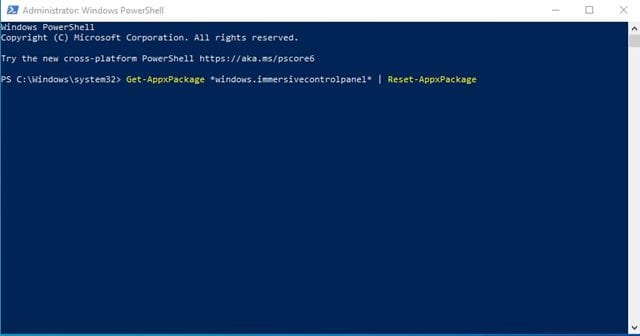
Step 3. On the PowerShell window, enter: Get-AppxPackage windows.immersivecontrolpanel | Reset-AppxPackage
Step 4. Once done, press the Enter button. That’s it! You are done. This is how you can reset Windows 10 Settings app via Powershell.
3. Reset the Settings App via Command Prompt
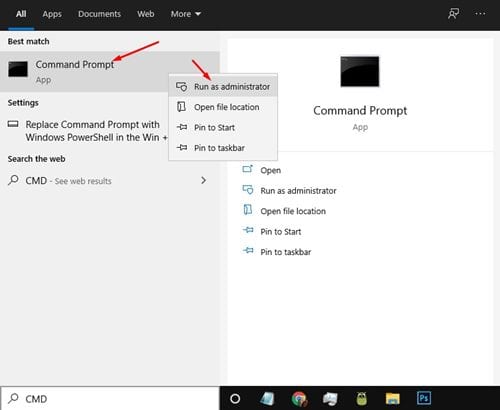
If you are not running Windows 10 version 21H2, you need to utilize the Command Prompt to reset the Settings app. Follow some of the simple steps given below to reset the Settings app via CMD. Step 1. First of all, open Windows search and search for ‘Command Prompt.’ Step 2. Right-click on the Command Prompt and select ‘Run as administrator.’
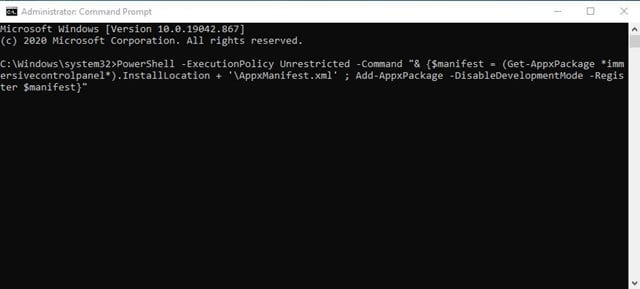
Step 3. On the Command Prompt, enter the command – PowerShell -ExecutionPolicy Unrestricted -Command “& {$manifest = (Get-AppxPackage immersivecontrolpanel).InstallLocation + ‘\AppxManifest.xml’ ; Add-AppxPackage -DisableDevelopmentMode -Register $manifest}”
Step 4. Once done, press the Enter button. That’s it! You are done. This is how you can reset the Settings app via Command Prompt. So, this guide is all about how to reset the Settings app on Windows 10. I hope this article helped you! Please share it with your friends also. If you have any doubts related to this, let us know in the comment box below.
Δ